


Paper Piecing allows you to accurately create intricate and
graphical patterns which would be hard to construct in other ways. Using little pieces of your favorite fabrics from that priceless stash is also a
lot of fun.
How does it work?
You will be sewing directly on the solid lines that are
either printed or drawn on the paper pattern. Then you will tear the paper off from the fabric when you are done.
What do you
need?
- Sewing machine
- Regular print paper (preferably lightweight)
- Paper pieced patterns (you can either purchase or construct them yourself)
- Clothing Iron or Seam Roller (often used for wallpaper)
- Transparent ruler
- Rotary cutter
- Cutting mat
- Scissors
- Seam Ripper (optional)
- Quilting Pins (optional)
A few tips to get started
- Most paper pieced patterns use a grouping order system. For example, a pattern might be consisted of A1,A2,A3,A4,B1,B2,B3,C1,C2,C3,D1,D2. You will simply follow the sequential order from A1 to D2. This order will guide you to complete the picture without running into any trouble.
- When you are connecting different groups, make sure each group has a ¼” seam allowance around the whole unit.
- Paper pieced blocks will always result in a mirrored version of what’s drawn on the paper. So keep that in mind when you are starting a project.
- To accurately print your pdf downloads, make sure that the page scaling option is set to “none." You can easily reduce or enlarge the pattern by printing at a different percentage. For example, if you have a 5" x 6" pattern and you want it print to 10" x 12", you will print at 200%. If the enlarged pattern does not fit into 8.5" x 11" paper at home, you can visit the local copy shop and print with 11" x 17" paper.
Paper Piecing Tutorial

This pattern is free and available on the free downloads page of my blog.
TIP: Because there is only one group in this pattern, you
won’t see group names such as A,B,C. Instead, you only need to follow the
numbers from 1 to 9.
Supplies: Sewing machine, regular print paper (preferably lightweight), Clothing Iron, fabric starch, Seam Roller for wallpaper (I like to use the seam roller since it saves me the trips to go to the iron board), ruler (I use a 1"x12" transparent quilting ruler), rotary cutter, cutting mat, scissors, seam ripper for fixing mistakes, and quilting pins

Print
out my free Camping Tent pattern. There are two versions of it. Remember that
the finished block will be a mirrored image of what is shown on the paper. So
you can decide which one to work on.

I am using regular printer paper to print out my pattern, and because it is not a lightweight paper, I like to puncture the lines on my pattern before I start. This step helps me to easily tear the papers off when I am done. If you would like to try it, change the stitch length on your sewing machine to 1.5, and follow the lines on the pattern without any thread. You don't need to do this to the border of the pattern, just the lines inside.

Select your fabrics! If you downloaded my pattern, you will see that on the second page of the pdf, you can use color pencils and make notes about your fabric choices. You can keep referring back to this page as you are constructing your block. The more complicated the block is, the more important it is to do this step because you might forget which fabrics you are using for particular pieces.

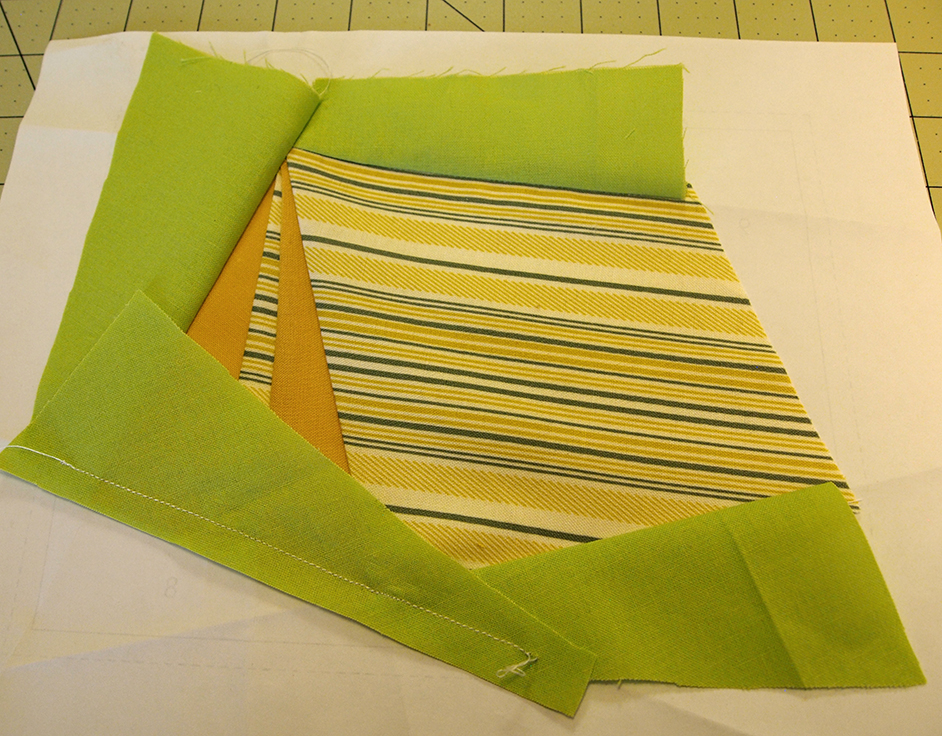
I decided to use solid green for the background, a yellow/green striped fabric for the tent, and a solid yellow for the tent flaps.
Cut out your fabrics. An easy way to do this without wasting a lot of fabric is to print an extra copy of the pattern, cut out every shape, and lay them on top of the wrong side of the fabrics you will use. Now cut around these shapes with a generous ¼” border. I used the scissors to cut my fabrics this time, but it is actually better if you use a rotary cutter and make straight line cuts.

Now let's begin paper piecing!
Put Piece 1 under your pattern and stabilize it with a quilting pin. Make sure that there is a 1/4" border around the triangle. If you are using a fabric that has a wrong and right side, the wrong side should be facing the paper. (*This picture is showing the back of the paper.)


The red line on this picture is drawn right along the edge of the paper. You need to make a cut 1/4" away from the edge of the paper.


Now you will carefully flip the paper. You can use the quilting pins to stabilize Piece 2 onto Piece 1. Or if you are like me, you will trust that your hands won't move these fabrics out of the place. Sew along the line between Piece 1 and Piece 2. (Use the stitch length setting of 1.5) This line is shown with the blue line in the picture.


Sew along the line between Piece 2 and Piece 3. (*Shown with a blue line in the picture)


Sew along the line between Piece 5 and Piece 6. (which is also adjacent to Piece 1 as shown with the blue line)


Attach Piece 9. You are almost done!


I am using regular printer paper to print out my pattern, and because it is not a lightweight paper, I like to puncture the lines on my pattern before I start. This step helps me to easily tear the papers off when I am done. If you would like to try it, change the stitch length on your sewing machine to 1.5, and follow the lines on the pattern without any thread. You don't need to do this to the border of the pattern, just the lines inside.

Select your fabrics! If you downloaded my pattern, you will see that on the second page of the pdf, you can use color pencils and make notes about your fabric choices. You can keep referring back to this page as you are constructing your block. The more complicated the block is, the more important it is to do this step because you might forget which fabrics you are using for particular pieces.

I decided to use solid green for the background, a yellow/green striped fabric for the tent, and a solid yellow for the tent flaps.
Cut out your fabrics. An easy way to do this without wasting a lot of fabric is to print an extra copy of the pattern, cut out every shape, and lay them on top of the wrong side of the fabrics you will use. Now cut around these shapes with a generous ¼” border. I used the scissors to cut my fabrics this time, but it is actually better if you use a rotary cutter and make straight line cuts.

Now let's begin paper piecing!
Put Piece 1 under your pattern and stabilize it with a quilting pin. Make sure that there is a 1/4" border around the triangle. If you are using a fabric that has a wrong and right side, the wrong side should be facing the paper. (*This picture is showing the back of the paper.)

Now make a fold on the line between Piece 1 and Piece 2 like this. If you punctured the lines with your sewing machine, it makes the folding really easy as well.

The red line on this picture is drawn right along the edge of the paper. You need to make a cut 1/4" away from the edge of the paper.


You are ready to place Piece 2. This is when you realize that it would have been great if you made straight line cuts of your pieces. If you didn't, it's okay. Try to line up the edge of Piece 2 to the straight edge of Piece 1. The right side of Piece 2 will be facing the paper this time.

This is what it looks like when you unfold the paper.

Now you will carefully flip the paper. You can use the quilting pins to stabilize Piece 2 onto Piece 1. Or if you are like me, you will trust that your hands won't move these fabrics out of the place. Sew along the line between Piece 1 and Piece 2. (Use the stitch length setting of 1.5) This line is shown with the blue line in the picture.

When you are done, flip the paper, and you will see this.

Press the seams open with a seam roller if you have one. If not, use the iron to press.

Leave Piece 2's seams open. Make a fold on the line between Piece 2 and Piece 3. Once again, the red line on the picture is right along the edge of the paper. Cut 1/4" away from the edge of the paper.


Now lets place Piece 3. Make sure that the right side of the fabric is facing the paper, and when it is sewn and its seams are pressed open, it should cover section 3 of the paper with a 1/4" border around it.

This is what it looks like when you unfold the paper.

Sew along the line between Piece 2 and Piece 3. (*Shown with a blue line in the picture)

When you are done, flip the paper and press the seams open.


* This is an example of a mistake of when you are not careful with lining the pieces.
It happens to me a lot. Don't fret. The seam ripper is your friend :)

Moving on... Now you will fold along the line between Piece 3 and Piece 4. Make a cut 1/4" away from the edge of the paper.

Place Piece 4 along the straight edge of Piece 3. Don't forget: the right side of the fabric is facing the paper.

Flip the paper carefully, and sew along the line between Piece 3 and Piece 4. (*Shown with a blue line in the picture)

Flip the paper again, and press the seams open.


It's so much fun to see the development of a pattern. I hope you are getting the hang of it.
Fold along the line between Piece 4 and Piece 5.
Let's make a cut 1/4" away from the edge of the paper again.

Place Piece 5 on the straight edge of Piece 4.

Flip the paper and sew along the line between Piece 4 and Piece 5. (*Shown with a blue line in the picture)

Press the seams open.

Fold along the line between Piece 5 and Piece 6, and make a cut 1/4" away from the edge of the paper.

Sew along the line between Piece 5 and Piece 6. (which is also adjacent to Piece 1 as shown with the blue line)

Press the seams open.

I think you got it from here on.
Attach Piece 7.

Attach Piece 8.


You can now flip the paper and trim the excess fabrics by cutting along the dotted lines.

Peel the paper off!
I happen to enjoy this step, but if you find it tedious, you can do it while watching TV or other kinds of entertainment. One tip on peeling is that it's good to start from the outer edge of the block. Don't pull the paper with too much force, or you could weaken and unravel the threads.


When you are finished with peeling, you can iron the block with some fabric starch to keep it flat and ready to be attached to another project!

I hope you enjoyed my tutorial on Camping Tent block :)
More Resources
Craftsy
Craftsy is a wonderful website if you want to take online classes on quilting, sewing, knitting, or other fun crafts. They have HD videos of step by step instructions by amazing teachers, and these videos never expire! You can also download course materials and instructions, participate in discussions, and purchase patterns and materials.
I took several classes from Quilting and Sewing sections, and I learned a lot. I highly recommend it.
If you want to watch videos on paper piecing, there is a free class from Craftsy:
Amy Gibson teaches how to construct 12 different modern quilt blocks.
March video is on Foundation piecing, and October video is on Paper piecing.
They are wonderful if you have never paper pieced before.
Quilting Tutorials by Missouri Star Quilt Co.
When I was looking for quilt tutorial videos on You Tube, I quickly found out that there are not that many with HD option available. So, Missouri Star Quilt Co. is one of the few channels that offers excellent tutorials with high definition quality. Quilting and sewing tutorials often have many intricate steps, and watching these tutorial videos on high definition gives you a clearer view of these techniques.
There is not a tutorial on Paper Piecing, but there are tons of other videos that are great for novice and experienced quilters. There are videos on creating many different quilting blocks, quilting terminology, applique, mini projects, finishing a quilt and more. Jenny can talk pretty fast, but she is really awesome. She will show you how to use different tools and utilize jelly rolls, layer cakes, and scraps of fabrics.
Martingale - How to Quilt
Paper-Foundation Quilting
If you don't feel like watching videos, Martingale has a library of quilt techniques on pdf files. They have really good diagrams and tips that you would see on quilt books and magazines. Topics include quilting vocabulary, rotary cutting, binding, paper-foundation quilting, and more. Worth checking out if you are looking for very basic quilting reference.


This was a really nice post. In idea I would like to put in writing like this additionally ? taking time and actual effort to make a very good article? but what can I say? I procrastinate a lot and by no means seem to get something done.
ReplyDeleteCustom Yoga pants